Scikit-Mol – Easy Embedding of RDKit into Scikit-Learn
I’d like to share a post about a project I’ve been involved in developing—Scikit-Mol. I believe it’s a noteworthy project deserving attention. It has already been featured in another blog post (thanks!) and in an RDKit lightning talk, as well as a preprint[1]. Nevertheless, I wanted to provide a more detailed example and explain some of the background.
Scikit-Mol originated during an RDKit hackathon and has gradually evolved into a tool that I find highly useful myself. As the name suggests, Scikit-Mol is related to Scikit-learn and molecules, and that’s precisely correct. In a nutshell, it offers convenient Scikit-learn transformer objects that can transform molecules into features, such as fingerprints or descriptors.
While it might seem similar to what other tools like RDKit already do, the key distinction lies in the scikit-learn compatibility. This compatibility introduces some cool properties. I’ve created an illustration to demonstrate various ways predictive models can be built.
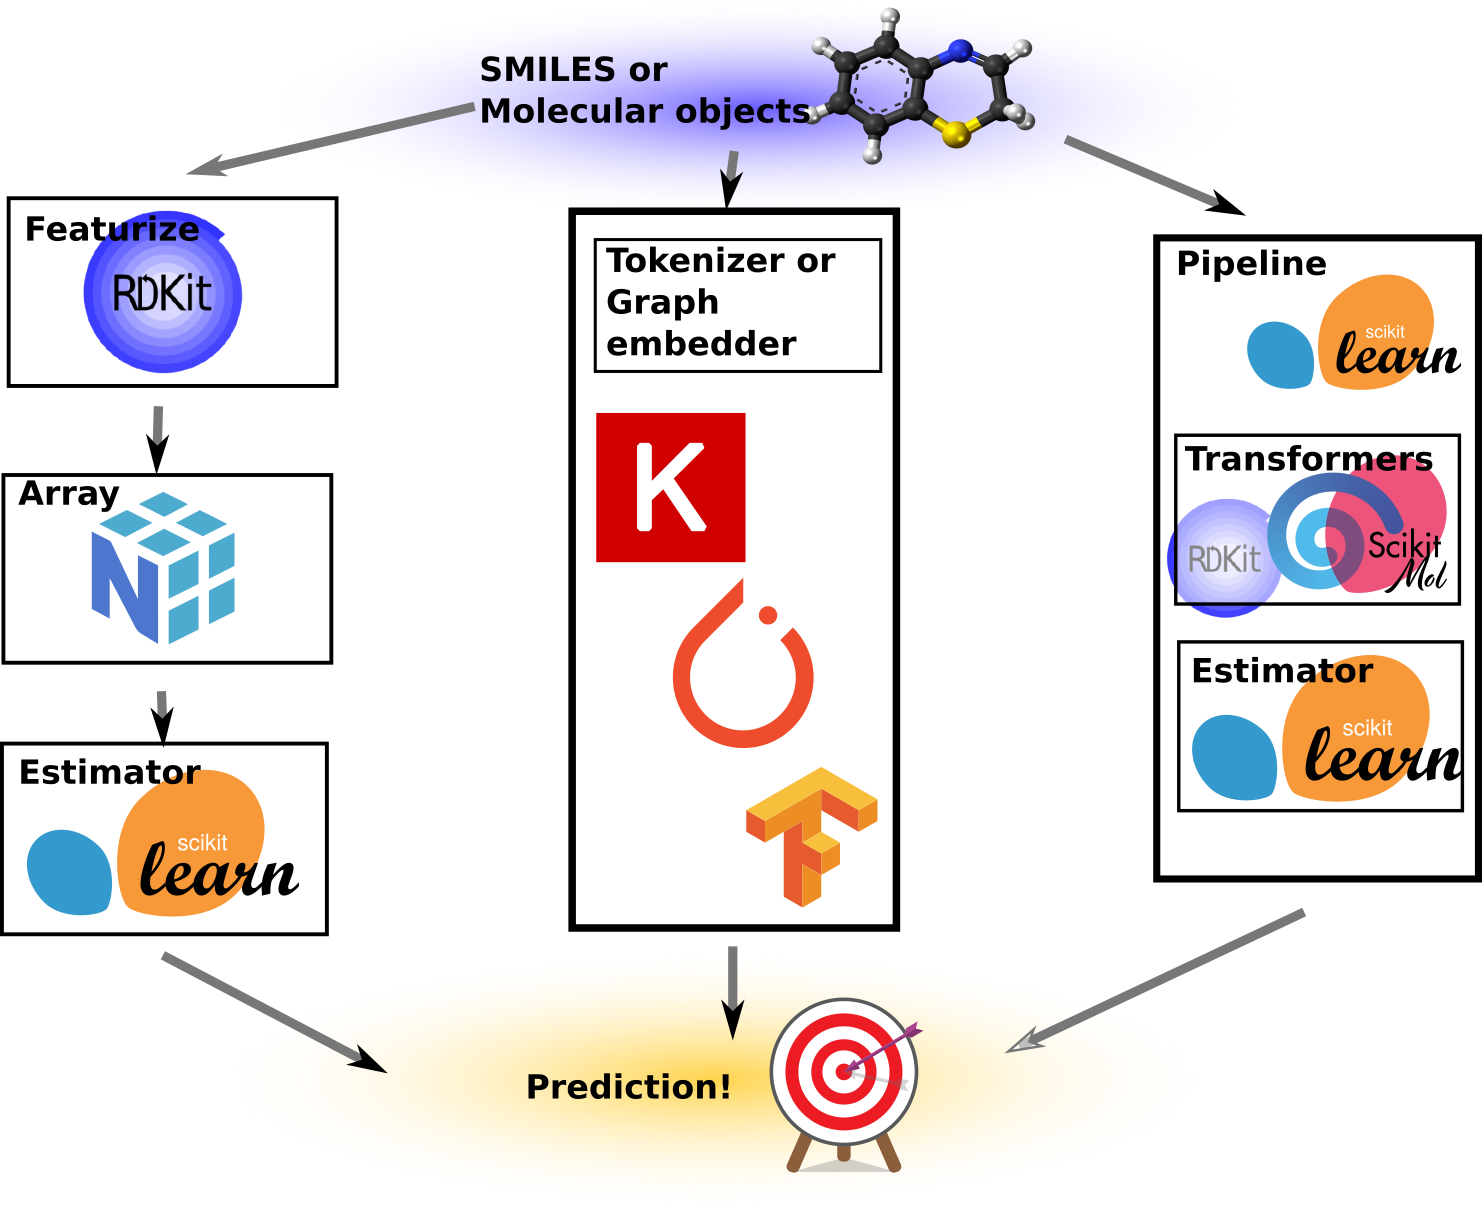
To the left-most is the “traditional” machine learning way, or at least how I’ve done it on multiple occasions in the past. We take our SMILES or molecular objects and use some custom code or script to turn these into NumPy arrays of numbers, which then become our features or X matrix. These arrays are subsequently fed into a Scikit-learn estimator together with the target variables, y. After fitting, the model can provide predictions for molecules that are featureized in exactly the same way. It never happened, of course, that a pickled Scikit-learn model from a previous project became suddenly unusable because the featurizer code or settings were lost. Nonetheless, it requires extra effort to save these things separately. This approach gives full control, allows for all kinds of manipulations of the features and numbers, and ends up containing a lot of boilerplate code and custom wrappers and save/load routines.
The next approach illustrated is the deep learning approach. This is cool as a concept because we let the neural network directly figure out what features to extract by presenting it with “raw” representations such as molecular graphs, SMILES, or even images of molecular drawings. We can thus get a model that can read molecules or SMILES strings. However, upon inspection, inside the code are often embedders, such as graph embedders or string tokenizers anyway (e.g., PySMILESUtils). Moreover, the models are usually a lot more complicated to write and use than the simpler Scikit-Learn models. Additionally, the need for learning the features from scratch may require larger datasets than what is often available in the typical molecular datasets we need to work with, or will require extensive regularization and tuning of hyperparameters.
The last approach is an illustration of what Scikit-Mol does. Here, a Scikit-Learn pipeline is used to contain the Scikit-Mol object (which basically wraps RDKit for featurization). We end up with a Python object that has the familiar .fit() and .predict() methods we’re used to from Scikit-Learn, but it is totally self-contained. What I mean by that is, it can be pickled and unpickled, and it’s self-documented as its config and settings can be examined upon loading (Not that I ever forgot the hyperparameters of a pickled model…). Furthermore, it can ingest RDKit-compatible SMILES or RDKit molecules, depending on how we build the pipeline stack.
Hyperparameter tuners that work directly with Scikit-learn estimators can now also be used to tune the settings of the featurizer, such as bit-size, use of counts or features, and the radius of Morgan fingerprints. As a bonus, it also renders cute little HTML diagrams of the pipeline and settings when used in interactive notebooks! I hope I’ve got your attention with this list of nice features, so let’s dive into some code examples!
Installation is pretty straightforward as the package is on PyPI.
%pip install scikit-mol
    Requirement already satisfied: scikit-mol in /home/esben/condaenvs/rdkit2/lib/python3.10/site-packages (0.2.1.post3+g0848f6d.d20230922)
    Requirement already satisfied: scikit-learn in /home/esben/condaenvs/rdkit2/lib/python3.10/site-packages (from scikit-mol) (1.2.1)
    Requirement already satisfied: pandas in /home/esben/condaenvs/rdkit2/lib/python3.10/site-packages (from scikit-mol) (1.5.3)
    Requirement already satisfied: rdkit in /home/esben/condaenvs/rdkit2/lib/python3.10/site-packages (from scikit-mol) (2022.9.4)
    Requirement already satisfied: numpy in /home/esben/condaenvs/rdkit2/lib/python3.10/site-packages (from scikit-mol) (1.24.2)
    Requirement already satisfied: python-dateutil>=2.8.1 in /home/esben/condaenvs/rdkit2/lib/python3.10/site-packages (from pandas->scikit-mol) (2.8.2)
    Requirement already satisfied: pytz>=2020.1 in /home/esben/condaenvs/rdkit2/lib/python3.10/site-packages (from pandas->scikit-mol) (2022.7.1)
    Requirement already satisfied: Pillow in /home/esben/condaenvs/rdkit2/lib/python3.10/site-packages (from rdkit->scikit-mol) (9.4.0)
    Requirement already satisfied: scipy>=1.3.2 in /home/esben/condaenvs/rdkit2/lib/python3.10/site-packages (from scikit-learn->scikit-mol) (1.10.1)
    Requirement already satisfied: joblib>=1.1.1 in /home/esben/condaenvs/rdkit2/lib/python3.10/site-packages (from scikit-learn->scikit-mol) (1.2.0)
    Requirement already satisfied: threadpoolctl>=2.0.0 in /home/esben/condaenvs/rdkit2/lib/python3.10/site-packages (from scikit-learn->scikit-mol) (3.1.0)
    Requirement already satisfied: six>=1.5 in /home/esben/condaenvs/rdkit2/lib/python3.10/site-packages (from python-dateutil>=2.8.1->pandas->scikit-mol) (1.16.0)
    Note: you may need to restart the kernel to use updated packages.
With the package installed, it’s easy to import and configure one of the transformers. Here we import an RDKit fingerprint transformer for illustration, but there are others available.
from scikit_mol.fingerprints import RDKitFingerprintTransformer
transformer = RDKitFingerprintTransformer(maxPath=5)
print(transformer)
RDKitFingerprintTransformer(maxPath=5)
Only the non-default parameters are shown, which is nice, as we would otherwise miss a custom setting in the sea of defaults. In interactive notebooks, displaying the object, or having it as the output of the last line, renders a small HTML widget with the settings. Not very useful with a single estimator, but good to have when we start to build pipelines later.
transformer
RDKitFingerprintTransformer(maxPath=5)
In a Jupyter environment, please rerun this cell to show the HTML representation or trust the notebook.
On GitHub, the HTML representation is unable to render, please try loading this page with nbviewer.org.
RDKitFingerprintTransformer(maxPath=5)
The object is fully documented via the .get_params() method, which gives a dictionary of the settings. The settings can be manipulated in the dictionary, saved to JSON, YAML, or whatever, and later used to set the configuration of the object with the .set_params() method. This provides some interesting possibilities to store and set model configurations from sources other than Python prompts.
parameters = transformer.get_params()
parameters
    {'atomInvariantsGenerator': None,
     'branchedPaths': True,
     'countBounds': None,
     'countSimulation': False,
     'fpSize': 2048,
     'maxPath': 5,
     'minPath': 1,
     'numBitsPerFeature': 2,
     'parallel': False,
     'useBondOrder': True,
     'useHs': True}
parameters["maxPath"] = 4
transformer.set_params(**parameters)
print(transformer)
RDKitFingerprintTransformer(maxPath=4)
We need some molecules to play with, but otherwise transformation into features is as easy as .transform().
from rdkit import Chem
smiles_strings = ["c1ccccc1", "Cc1ccncc1CCCN", "Cc1ccncc1CN"]
mols = [Chem.MolFromSmiles(smiles) for smiles in smiles_strings]
fps = transformer.transform(mols)
print(f"{fps.__class__=}")
print(f"{fps.shape=}")
    fps.__class__=<class 'numpy.ndarray'>
    fps.shape=(3, 2048)
This can, of course, be used to substitute the code for featurization for the “traditional” way from the first illustration. As such, it functions merely as an RDKit wrapper where some customizability is traded for convenience and another API. However, the true power lies in the Scikit-learn integration, as I’ll illustrate shortly. First, some imports to make it all work.
import os
from rdkit.Chem import PandasTools
import pandas as pd
from sklearn.pipeline import make_pipeline, make_union
from sklearn.linear_model import Ridge
from sklearn.model_selection import train_test_split
from sklearn.preprocessing import PolynomialFeatures
from scikit_mol.descriptors import MolecularDescriptorTransformer
from scikit_mol.conversions import SmilesToMolTransformer
The data file I use for illustration is the SLC6A4 activity data from ExcapeDB, which is available for direct download. I know from previous experience that it behaves well for predictive modeling. Pandas is useful for parsing and handling tabular data, and PandasTools from RDKit makes it easy to quickly add a column with molecular objects.
csv_file = "SLC6A4_active_excape_export.csv"
if not os.path.exists(csv_file):
    import urllib.request
    url = "https://ndownloader.figshare.com/files/25747817"
    urllib.request.urlretrieve(url, csv_file)
data = pd.read_csv(csv_file)
PandasTools.AddMoleculeColumnToFrame(data, smilesCol="SMILES")
print(f"{data.ROMol.isna().sum()} out of {len(data)} SMILES failed in conversion")
0 out of 7228 SMILES failed in conversion
The first thing is always to split off a test set. We will simply use random splitting using the Scikit-Learn function train_test_split.
mol_list_train, mol_list_test, y_train, y_test = train_test_split(data.ROMol, data.pXC50, random_state=0xFACE)
With the list of molecules and target values in place, we can start to construct our Scikit-Learn model. To make it slightly more interesting, we’ll build a model that uses fingerprints with the addition of some selected descriptors that are feature-expanded polynomially with a degree of 2 (cross-terms and squares). This is done by combining Scikit-Mol classes with some standard classes from Scikit-Learn to create a pipeline model. It serves as a nice illustration of how the Scikit-Mol transformers and Scikit-Learn estimators can be joined in multiple pipelines that can then be combined and nested into a final Scikit-Learn model. We’ll end up constructing a model that reads SMILES strings for prediction.
model = make_pipeline( make_union(
                                RDKitFingerprintTransformer(maxPath=4),
                                make_pipeline(MolecularDescriptorTransformer(desc_list=["MolWt", "BalabanJ"]),
                                              PolynomialFeatures(degree=2)),
                                n_jobs=2),
                        Ridge(alpha=10)
)
In principle, this is a single line of code, but it can also be built up sequentially, which may be easier to read and debug.
descriptor_calculator = MolecularDescriptorTransformer(desc_list=["MolWt", "BalabanJ"])
desc_pipeline = make_pipeline(descriptor_calculator,
                              PolynomialFeatures(degree=2))
fingerprinter = RDKitFingerprintTransformer(maxPath=4)
features_pipeline = make_union ( desc_pipeline, fingerprinter)
estimator = Ridge(alpha=10)
model = make_pipeline ( features_pipeline, estimator)
model.fit(mol_list_train, y_train)
Pipeline(steps=[('featureunion',
                 FeatureUnion(transformer_list=[('pipeline',
                                                 Pipeline(steps=[('moleculardescriptortransformer',
                                                                  MolecularDescriptorTransformer(desc_list=['MolWt',
                                                                                                            'BalabanJ'])),
                                                                 ('polynomialfeatures',
                                                                  PolynomialFeatures())])),
                                                ('rdkitfingerprinttransformer',
                                                 RDKitFingerprintTransformer(maxPath=4))])),
                ('ridge', Ridge(alpha=10))])
In a Jupyter environment, please rerun this cell to show the HTML representation or trust the notebook.
On GitHub, the HTML representation is unable to render, please try loading this page with nbviewer.org.
Pipeline(steps=[('featureunion',
                 FeatureUnion(transformer_list=[('pipeline',
                                                 Pipeline(steps=[('moleculardescriptortransformer',
                                                                  MolecularDescriptorTransformer(desc_list=['MolWt',
                                                                                                            'BalabanJ'])),
                                                                 ('polynomialfeatures',
                                                                  PolynomialFeatures())])),
                                                ('rdkitfingerprinttransformer',
                                                 RDKitFingerprintTransformer(maxPath=4))])),
                ('ridge', Ridge(alpha=10))])
FeatureUnion(transformer_list=[('pipeline',
                                Pipeline(steps=[('moleculardescriptortransformer',
                                                 MolecularDescriptorTransformer(desc_list=['MolWt',
                                                                                           'BalabanJ'])),
                                                ('polynomialfeatures',
                                                 PolynomialFeatures())])),
                               ('rdkitfingerprinttransformer',
                                RDKitFingerprintTransformer(maxPath=4))])
MolecularDescriptorTransformer(desc_list=['MolWt', 'BalabanJ'])
PolynomialFeatures()
RDKitFingerprintTransformer(maxPath=4)
Ridge(alpha=10)
print(f"Train score is {model.score(mol_list_train, y_train)}")
print(f"Test score is {model.score(mol_list_test, y_test)}")
    Train score is 0.6152054104221175
    Test score is 0.49486369742785596
The model could probably benefit from a lot more care with the hyperparameters, selection of Scikit-Learn estimator, what descriptors to use, etc., etc.
I promised to show an example of a model that predicts directly from SMILES. By simply using the make_pipeline function from Scikit-Learn, we can merge the trained pipeline model with the transformer for converting SMILES strings into molecular objects.
smiles_model = make_pipeline(SmilesToMolTransformer(), model)
smiles_model
Pipeline(steps=[('smilestomoltransformer', SmilesToMolTransformer()),
                ('pipeline',
                 Pipeline(steps=[('featureunion',
                                  FeatureUnion(transformer_list=[('pipeline',
                                                                  Pipeline(steps=[('moleculardescriptortransformer',
                                                                                   MolecularDescriptorTransformer(desc_list=['MolWt',
                                                                                                                             'BalabanJ'])),
                                                                                  ('polynomialfeatures',
                                                                                   PolynomialFeatures())])),
                                                                 ('rdkitfingerprinttransformer',
                                                                  RDKitFingerprintTransformer(maxPath=4))])),
                                 ('ridge', Ridge(alpha=10))]))])
In a Jupyter environment, please rerun this cell to show the HTML representation or trust the notebook.
On GitHub, the HTML representation is unable to render, please try loading this page with nbviewer.org.
Pipeline(steps=[('smilestomoltransformer', SmilesToMolTransformer()),
                ('pipeline',
                 Pipeline(steps=[('featureunion',
                                  FeatureUnion(transformer_list=[('pipeline',
                                                                  Pipeline(steps=[('moleculardescriptortransformer',
                                                                                   MolecularDescriptorTransformer(desc_list=['MolWt',
                                                                                                                             'BalabanJ'])),
                                                                                  ('polynomialfeatures',
                                                                                   PolynomialFeatures())])),
                                                                 ('rdkitfingerprinttransformer',
                                                                  RDKitFingerprintTransformer(maxPath=4))])),
                                 ('ridge', Ridge(alpha=10))]))])
SmilesToMolTransformer()
Pipeline(steps=[('featureunion',
                 FeatureUnion(transformer_list=[('pipeline',
                                                 Pipeline(steps=[('moleculardescriptortransformer',
                                                                  MolecularDescriptorTransformer(desc_list=['MolWt',
                                                                                                            'BalabanJ'])),
                                                                 ('polynomialfeatures',
                                                                  PolynomialFeatures())])),
                                                ('rdkitfingerprinttransformer',
                                                 RDKitFingerprintTransformer(maxPath=4))])),
                ('ridge', Ridge(alpha=10))])
FeatureUnion(transformer_list=[('pipeline',
                                Pipeline(steps=[('moleculardescriptortransformer',
                                                 MolecularDescriptorTransformer(desc_list=['MolWt',
                                                                                           'BalabanJ'])),
                                                ('polynomialfeatures',
                                                 PolynomialFeatures())])),
                               ('rdkitfingerprinttransformer',
                                RDKitFingerprintTransformer(maxPath=4))])
MolecularDescriptorTransformer(desc_list=['MolWt', 'BalabanJ'])
PolynomialFeatures()
RDKitFingerprintTransformer(maxPath=4)
Ridge(alpha=10)
smiles_model.predict(["c1ccccc1"])
array([4.90180482])
So, this model is fairly complex but was created in a few lines of Python code. It can be pickled, unpickled, the hyperparameters listed with .get_params(), and we can simply feed it standard SMILES. The SMILES has to be valid and RDKit parsable though.
On the downside, adding the transformers to the model itself will make the model always calculate the features. And for larger datasets, some transformers and some fitting procedures (e.g., in cross-validation and hyper-parameter searches), this gives some unnecessary waiting time and resource usage. If it’s an issue, the featurization can be done separately from the model fitting (i.e., the “traditional way”), but then the final pipeline can still be assembled using the make_pipeline function into a nice, self-contained model.
I hope this illustrates why I’m quite enthusiastic about this approach. It makes the easy even easier, the complex easy, and the management of models and featurization a lot simpler.
Happy hacking and modeling!
Esben Jannik Bjerrum
I’m keen to hear your thoughts and experiences—let me know if it proves as useful for you as it has for us in the comments below!
Acknowledgements
Shout-outs to my co-workers on this project from the hackathon and beyond!
- Carmen Esposito @cespos
- Son Ha @son-ha-264
- Oh-hyeon Choung, @Ohyeon5
- Andreas Poehlmann, @ap–
- Ya Chen, @anya-chen
- Rafał Bachorz @rafalbachorz
- Adrien Chaton @adrienchaton
- Vincent-Alexander Scholz @VincentAlexanderScholz
- Benjamin Ries @RiesBen
- Ekaterina Bjerrum @Productivista
References
[1] Bjerrum, Esben Jannik, Rafał Adam Bachorz, Adrien Bitton, Oh-hyeon Choung, Ya Chen, Carmen Esposito, Son Viet Ha, and Andreas Poehlmann. “Scikit-Mol Brings Cheminformatics to Scikit-Learn.” ChemRxiv, December 6, 2023. https://doi.org/10.26434/chemrxiv-2023-fzqwd.
Some Questions and Answers
Where is the code and documentation?
On the GitHub repository, there are many notebooks in the notebooks folder to get you started, and we also wrote a short preprint. Each class is documented with docstrings that can be displayed using the help() function of Python.
How do I ask a question or report a bug?
Bugs are best handled by raising an issue at the repository’s issues page, and questions can either be raised there or as comments to this blog post, depending on the nature of the question. Please do not only write directly to me in an email, as fewer people will see the question, fewer will be able to help, and fewer will be able to learn from the answer or solution.
How do I contribute?
Thanks for the interest. We have some instructions in the CONTRIBUTION.md document at the repository. We also have a Slack channel for discussion, where you can ask to be added by sending a notice to me.
How do I standardize molecules?
The project has a standardizer transformer, which can do basic molecular standardization. Its use is illustrated in a notebook in the documentation.
How do I speed up calculations and fitting; my code is slow?
Most of the transformer classes support basic parallelization on Linux machines. Its performance is most effective for slower transformer classes such as the descriptor calculator. Also, consider using the classes to build the featurization pipeline separately, use it to obtain the X numpy array, then fit the model of choice, and in the end, assemble the final model with make_pipeline().
How do I tune the hyperparameters?
All tools out there that have been used to tune Scikit-Learn models can, in principle, also be used for Scikit-Mol models as they share the same API. We have an example of using one of Scikit-Learn’s own classes as well as an example of using an external tool, skopt.
How can I select what fingerprint to use as part of the tuning?
We also have an example notebook for that scenario.
How do I check for invalid SMILES in my dataset or as part of a production model?
We have not so far found any straightforward way to do this due to limitations in the way Scikit-Learn estimators work. They basically expect valid data and cannot currently work with invalid rows. This form of error handling is probably best done custom to the way how the model is integrated and used in a production setting. However, there is a basic utility to prefilter dataframes and examine the wrong SMILES strings as part of the project, with an example usage in this notebook. If you have any ideas how this could be done in a better and more generic way or know of any Scikit-Learn error handling wrapper projects, please reach out.
Pingback: Generating Unusual Molecules with Genetic Algorithms | Cheminformania
Pingback: Cambridge Cheminformatics Newsletter, January/February 2024 Edition – DrugDiscovery.NET – AI in Drug Discovery
Pingback: Update to Scikit-Mol: the power of community and open-source | Cheminformania